The roller mode in my BASE-Bf software computes liftoff speed for any continuous crest-trough profile and overlays three speed cases — useful for designing for both intended speed and rider error. And the new roller shape is beyond anything discussed below and is the new authority and approach to rollers imo.
Most of this page is dedicated to pump track rollers, but it should certainly help inform the application of these principles to “whoopee” like drains and rollers on or on the side of trails. More on grades and grade reversals is here.
Rollers
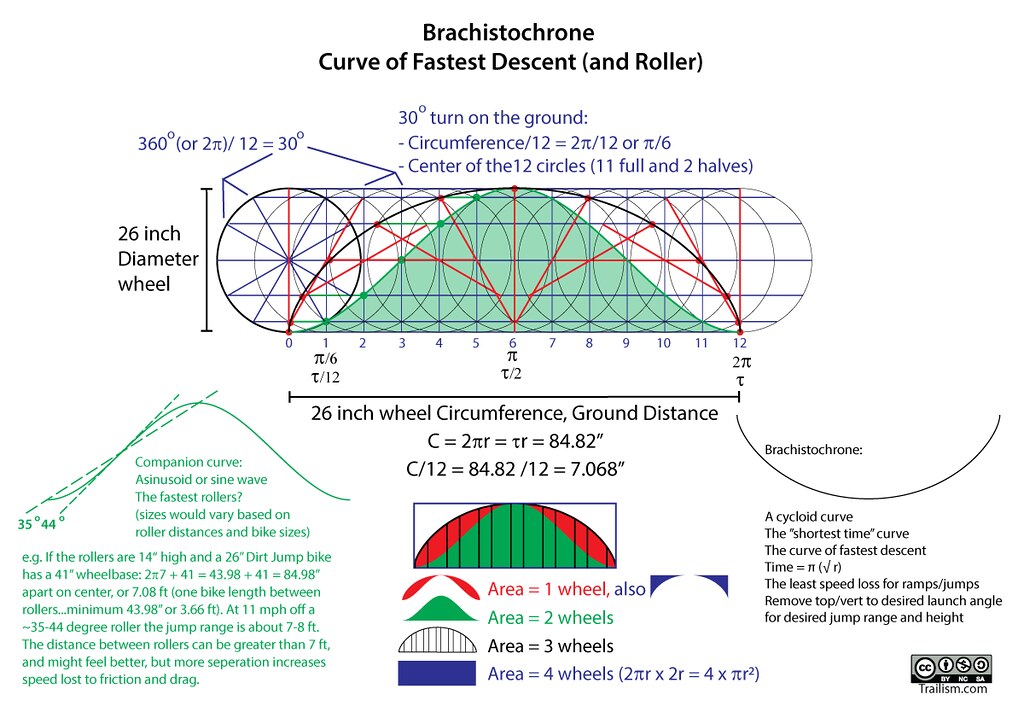
The original circles I daydreamed about on the Bike Jump Design and Calculator page are taken a little more seriously below (right click or hold to see bigger image):

The Brachistochrone “could” be the best curve or cycloid for dirt jumping to keep things fast, and the companion curve of the cycloid could make for a really good/efficient roller, especially on dirt pump tracks where friction loss is greater than a cement or asphalt track. However…
Fast is one thing, smooth is another. Or fast is smooth, smooth is fast, so consider clothoids or sine waves (see Bike Jump Design page). A cycloid or tautochrone could work for berms, but it depends on where riders come down the entry and out the exit (a circle radius will often be ridden as a clothoid or spiral as riders trim the circle entering and exiting a circular curve). Of course laying this type of berm out in the field would be a little tedious, if not futile. Also, is it really necessary, even on a pump track? And wouldn’t it suck to have cookie cutter replicas at nearly every berm, or roller for that matter? Would the character and art be lost? Yes. These curves/shapes are probably the most important on pump tracks where the goal is easy pumping and conserving as much energy as possible rather than losing it. Some consistency and rhythm is also nice on tracks. Nonetheless, knowing what this means and how it works can help builders understand the basic shapes and how to get more (or less) speed when needed, and how to not stray too far from efficient form, flow, and motion.
That said building rollers is helped greatly by experiencing different tracks and shapes and taking mental notes. Being a good rider will help when it comes to finally building your own track, or get you to a place where the rollers are good, and later better (or worse) with some tweaks. This article on how to pump is also worth a read: How to Pump Your Bike, According to Physics
I did test Brachistochrone rollers (see below). Long story short, don’t try this at home.

A bit too peaky
Looks are and aren’t deceiving, tests certainly confirm hypotheses on a certain look. Short answer: more rounded is better. The companion curve was too peaky, oh well, I tried. See images of Brachistochrone curves above and below. I think if this shape was 4-5 ft tall maybe it would work, or maybe not. It might be fun to test. Testing these companion curve rollers was not that fun, or it was more disappointing than fun. I had to try…and now you don’t have to hassle with it unless you want to try it yourself. Maybe you can try the 4-5 high ones, but that’s a lot of wood for the template, and dirt to move, or they could be made of wood.
A solution could be to combine the top of the Brachistochrone with the bottom of the companion curve, but ultimately pedal strike avoidance and flow is key. Something like a sine wave (explained below) seems practical, and can be replicated if you know the formula. It comes down to feel and art, or the art of the feel, but also the conservation of energy which should be understood and exploited, not ignored. Not only is less peaky more flowy at higher speeds, it is also easier to manual rounded rollers. However, less peaky and lower means a little less fast. At this time I’m not sure if softer and more flowy rollers can make up for the potential speed loss.


Pedal Strikes on Rollers
A better solution, or something to consider (especially if you are designing for strider bikes), is a roller that considers pedal strikes or strider bikes and scooters getting stuck or scraping the tops of your rollers:


Making A Sine Wave Roller (10:1)
Sine waves are found in nature all around us in the electromagnetic spectrum, sound and ocean waves, springs, AC current, and pendulums. Rollers can come in an endless array of possible shapes, but why not give riding sine waves a try? It’s not like sine waves are magic, but they do provide a nice feel, and they are easy to reproduce with dirt, wood, concrete, or asphalt.
We can hone in on a possible sine wave for rollers if we assume Lee McCormack is on to something, or close, with his recommended 10:1-ish ratio for most rollers.
The equation for a 12 inch tall sine wave roller using Lee McCormack’s recommended 10:1 ratio (10 ft to 1 ft, 120 in to 12 in) is found in the following equation: y = 6sin(1/19.0985 x), the red line below:
Try it at Desmos:
- Red: 10:1, 10 ft @ 12 in. high, about 17 degrees near 0,0
- Blue: 10:1.5, 10 ft @ 18 in. high
- Green: 10:2, 10 ft @ 24 in. high
- Purple: 10:2.5, 10 ft @ 30 in. high, about 38 degrees near 0,0
- Note that the wheelbase for a DJ is around 40 inches, the purple looks a bit jerky, not flowy
Red is probably the best sine wave for pump tracks at 10:1, and a ratio of 1:1 for trough:crest. Pump Track Nation has trough:crest 1.5:1(3:2 by Lee for some reason), 2:1, and 3:1 which aren’t the sine waves made above, but more peaky crests and bigger troughs (similar to keeping the red lower half and growing its width a little, and raising a more peaky top half to blue, green, or purple). If you want a template for more peaky I’d start with a 10:1 sine and then freehand wider troughs and more peaky crests as its probably easier than trying to do the math to get the curve. I have played with an isochronus Brachistochrone bottom half to three quarters then rounded the top.
The sine wave is easy to graph so I printed 1/4 of the 10 ft 10:1 template on 3 pages, cut them out, taped them together, then traced it and flipped it 4x to complete the frame/guide, but at only 8 ft long one end gets cut off by 2 feet, but it’s fine for shaping rollers as the wood guide can be rotated. Having another guide that is cut in half at 5 feet is nice for doubles or other features. A level will help make them even. Pedal strikes are not a concern with this sine wave option.


Best Roller curves and Spacing
I don’t know that 10:1 is the best, or if there is “a best,” but 10:1 does work and tends to feel good. I assume 12:1 or 5:1 would also work, but I can’t say what feels “best” yet or works “best” based on speeds and the desired outcomes until I do a lot more measuring. Again, Lee McCormack is worth consulting, and he goes into this in Pump Track Nation. I’ll trust Lee for now and stay close to 10:1 on my home track and application elsewhere, except for the few rollers that double as jumps.
To put the 10:1 ratio into perspective, average speeds for me are typically between 8 and 12+ mph on many pump tracks, sometimes faster depending on the track size and shape, with spikes into maybe ~15mph. Pros can hit 20 or more! On dirt jumps and bmx tracks (for me) it is usually 10-16+ mph (green and blue lines). If I need to go faster the tables might be a little bigger than I’m comfortable with. This is helpful in thinking about some baselines or benchmarks for spacing and jumping roller doubles and transfers etc., as well as possible baseline jump distances. Of course some riders are really good at pumping and popping to boost jumps past the range of mere mortals, but sine waves can be played hard, fast, and loud to make wheel music…

It may or may not be helpful to think of 10-12 mph as ~15-18 ft/sec when considering what the 10:1 ratio means. Meaning it takes less than 1/2 a second to go up a roller at those speeds. At 12 mph it takes about 1/2 a second to travel the entire 10:1 distance. Some rollers lend themselves to manuals better than others depending on fast you go.
Some sections of some pump tracks can sing to most people and most people can get in the pocket or groove so to speak. Some tracks have dead spots or the wrong combo of notes that turn flow into something sour. Sometimes a brake check or pedal stroke is necessary to correct or find the groove through a track, sometimes that possibility is wishful thinking, the music/waves need to be re-written.
Roller size
My bike, a “large” 26 inch DJ bike (42 inch (3.5 ft) wheelbase) takes up 70% of half a 10:1 roller: ~3.5ft/(10ft/2) = 0.70 (35% of the entire roller distance). It’s nice to have at least 20% to spare on the up or down of rollers if they will be jumped off and landed on. Any smaller and it takes more precision when landing, though all you really need is enough landing for the contact patch of the rear tire to roll down a few inches for pumping to the next roller. 20% would be 3.5×1.2= 4.2 feet, that is 8.4 ft long with a height of (8.4×12)/10= 10.08 inches high if 10:1. Rollers less than 10 inches high are rideable on a 42 inch wheelbase, but any smaller and it gets more difficult to work the transition before the next roller if landing for a jump or transfer.
Roller Distance
As riders start to get faster, like tracks with longer runways, a little more distance and height will help the track maintain a more flowly than bumpy feel when speeds get hot. However, good or fast body movements can smooth bump to flow within reason, and sometimes a bumpy poppy track is desired, although manuals might be harder.
The likelihood of pump track rollers acting as a jumps comes into perspective if we think of the waves and the riders moving on those waves. A rider going 8-12 mph, which isn’t necessarily slow, but on a 10:1 roller at a foot high with about a 14-17 degree takeoff the rider is probably only going to jump 3-6 feet, more if they boost the jump with body English. The tiny doubles on my tiny track are only about 3-5 feet crest to crest, which works for 8-12 mph. On faster tracks I can hit 15-17+ mph spikes, and at around 17 mph and 17 degrees it becomes more feasible to gap 10 foot spacing.
Sine Waves or Some Other Shape?
Your rollers don’t have to be sine waves, but having a template helps at least start and keep rollers even and round rather than peaky (unless you want that). I personally prefer to start round, and trim them to steeper or peaky if they are rollers I would like to double, but even round rollers can be jumped. Getting a consistent roller shape, or even a good shape in itself can take a very long time, and lot of skill and practice. It seems rudimentary or simple, but it isn’t. The possible variation in curvature and failure rate can be frustrating even if you think you have an eye. I don’t know where the dividing line sits between less than good shapes and great body mechanics to make things flow well. I assume it is a bell curve of various possibilities. Regardless, one thing is certain, “every flat spot on your pump track is a dead spot…no flat spots” (Lee McCormack), or keep them “short” at slower speed tracks.
“No flat spots” (except maybe tables) is important because the curves are where, or how, speed is generated. Additional speed (acceleration) from a pump is based on changing radii. For example, a radius of 8 feet can shrink to 7.5 if a rider extends 1/2 foot standing during a berm pump to get closer to the center of the curvature (or rotation) of the berm. Likewise, at the bottom between two rollers speed is increased when the radius shrinks from standing down the trailing roller.
.Wood roller templates not only help the original design and shrinking of flat spots, they will help maintenance checks to keep the shapes close to the designed intentions. The consistency and predictability provided by checking dirt rollers with wooden templates now and then pays for itself. Dirt tracks lose shape and possibly dirt over time, but wood templates can help temper or attune them back into shape.
More than Roller shape
Besides roller shape, the biggest mistake I see on tracks is in design layout where tracks go up or downhill. If down/uphill runs are not corrected by compensating with most roller crests staying at the same height regardless of up/downhill the track will probably have dead and hot spots. Meaning most crests are very close to the same height so they would get deeper as they descend, but maintain nearly the same average roller height. Pump tracks are a conservation of energy problem, the meat of the track should have the same potential energy, or roller height, same for most berm heights too. This doesn’t mean you can’t vary heights, but be conscious of how extra or deficit kinetic energy is used when jacking with potential energy differences, and how hard riders might have to work to make the track work. Some tracks are effortless, some will suck the life out of you…meaning someone didn’t do there energy conservation for you during the build. Wood turn walls can help riders compensate for hot sections into uphills because they will preload with a lot of potential energy to make up what they might loose going uphill or to taller rollers etc. They could also use extra kinetic energy via the extra potential energy to start doing doubles and triples.
Also worth noting is trying not to lay the the main runs parallel to prevailing winds. Hard winds will kill the best of tracks. This should be considered for DJ lines too, but I personally feel like going with the wind is better is this case, just in case.