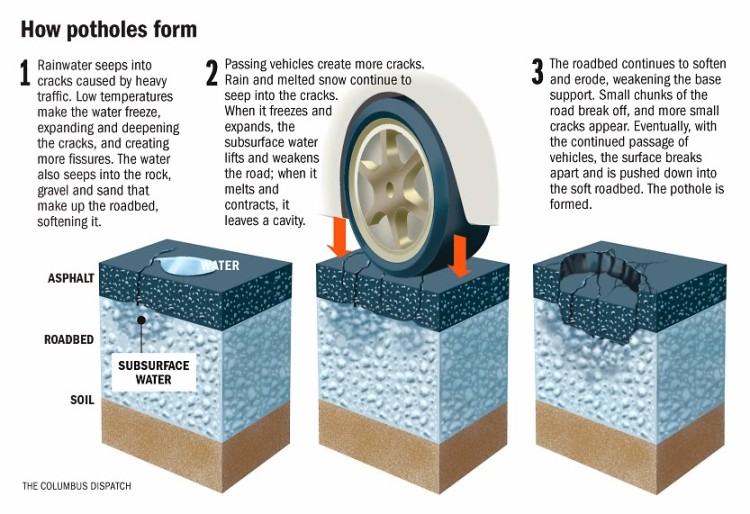
Frost heave and freeze thaw cycles can be a problem for trails where soil and weather conditions cooperate, but the problems are mostly associated with trail structures like steps, bridges, paving stones, drainage lenses, and walls. Frost heave is powerful enough to uplift large buildings so trail structures are not immune to disturbance. Long story short, only build structures when absolutely necessary. Heave can also upset and eject stones and gravel out of the trail tread in run-of-the-mill bench cut (sidehilled) trails, but the consequences are not as bad considering the skill and effort of constructing some trail structures.
Frost Action In Soils
Best Practices
The best practices used for trail building to deal with frost heave have been borrowed from the road and building construction industry. Whatever town or county a trail happens to be, there is a good chance that building codes (road/house/fence-wall/deck) in the area have specifications for frost heave abatement. Whether it is practical to follow or modify those guidelines on the side of a mountain in the forest is up to the trail builder, but its not as if some insights can’t be gathered to ensure trail structures don’t fail.
- Frost penetration results
- Cornell- subsurface water and frost heave
- Concrete Construction- How to Prevent Frost Heave- PDF
- FHWA DOT- infrastructure/pavement
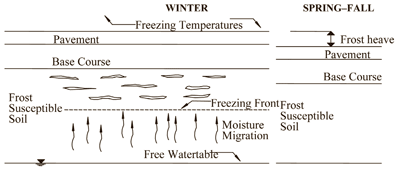 ^The ‘freezing front’ is where water can leave unfrozen soil to join in the growth of ice lenses/sheets, and this growth contributes to heaving.
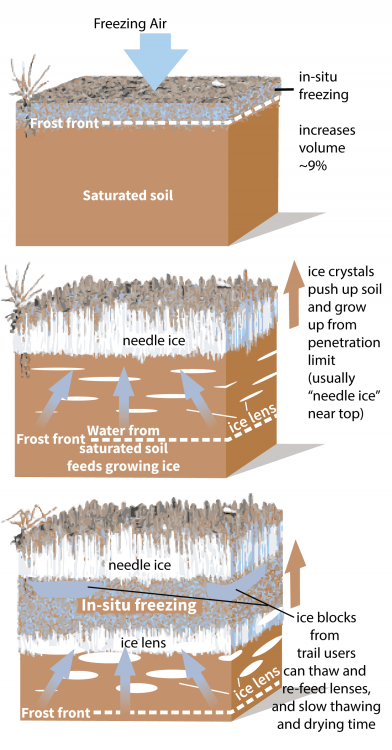
As with most trail building, observe and investigate similar structures in the local area to see how they have fared. If you do build a structure, go back to visit it in the spring after thaw and consider the winter’s weather conditions. Was there heave on bench cut areas, and/or on structures? How much crush did you use, and how moist was the soil when you compacted it? How much snow was there, and how long did it stay? If temperatures are low and there is no snow the risk of heave is greater as snow can insulate the ground. Don’t count on snow or a thin blanket of leaves for heave protection, rely on these three main building practices to reduce heave potential: soil compaction, crushed rock, and water removal if the trail can’t be relocated away from wet areas where the heave potential is greater.
Muddy Trails
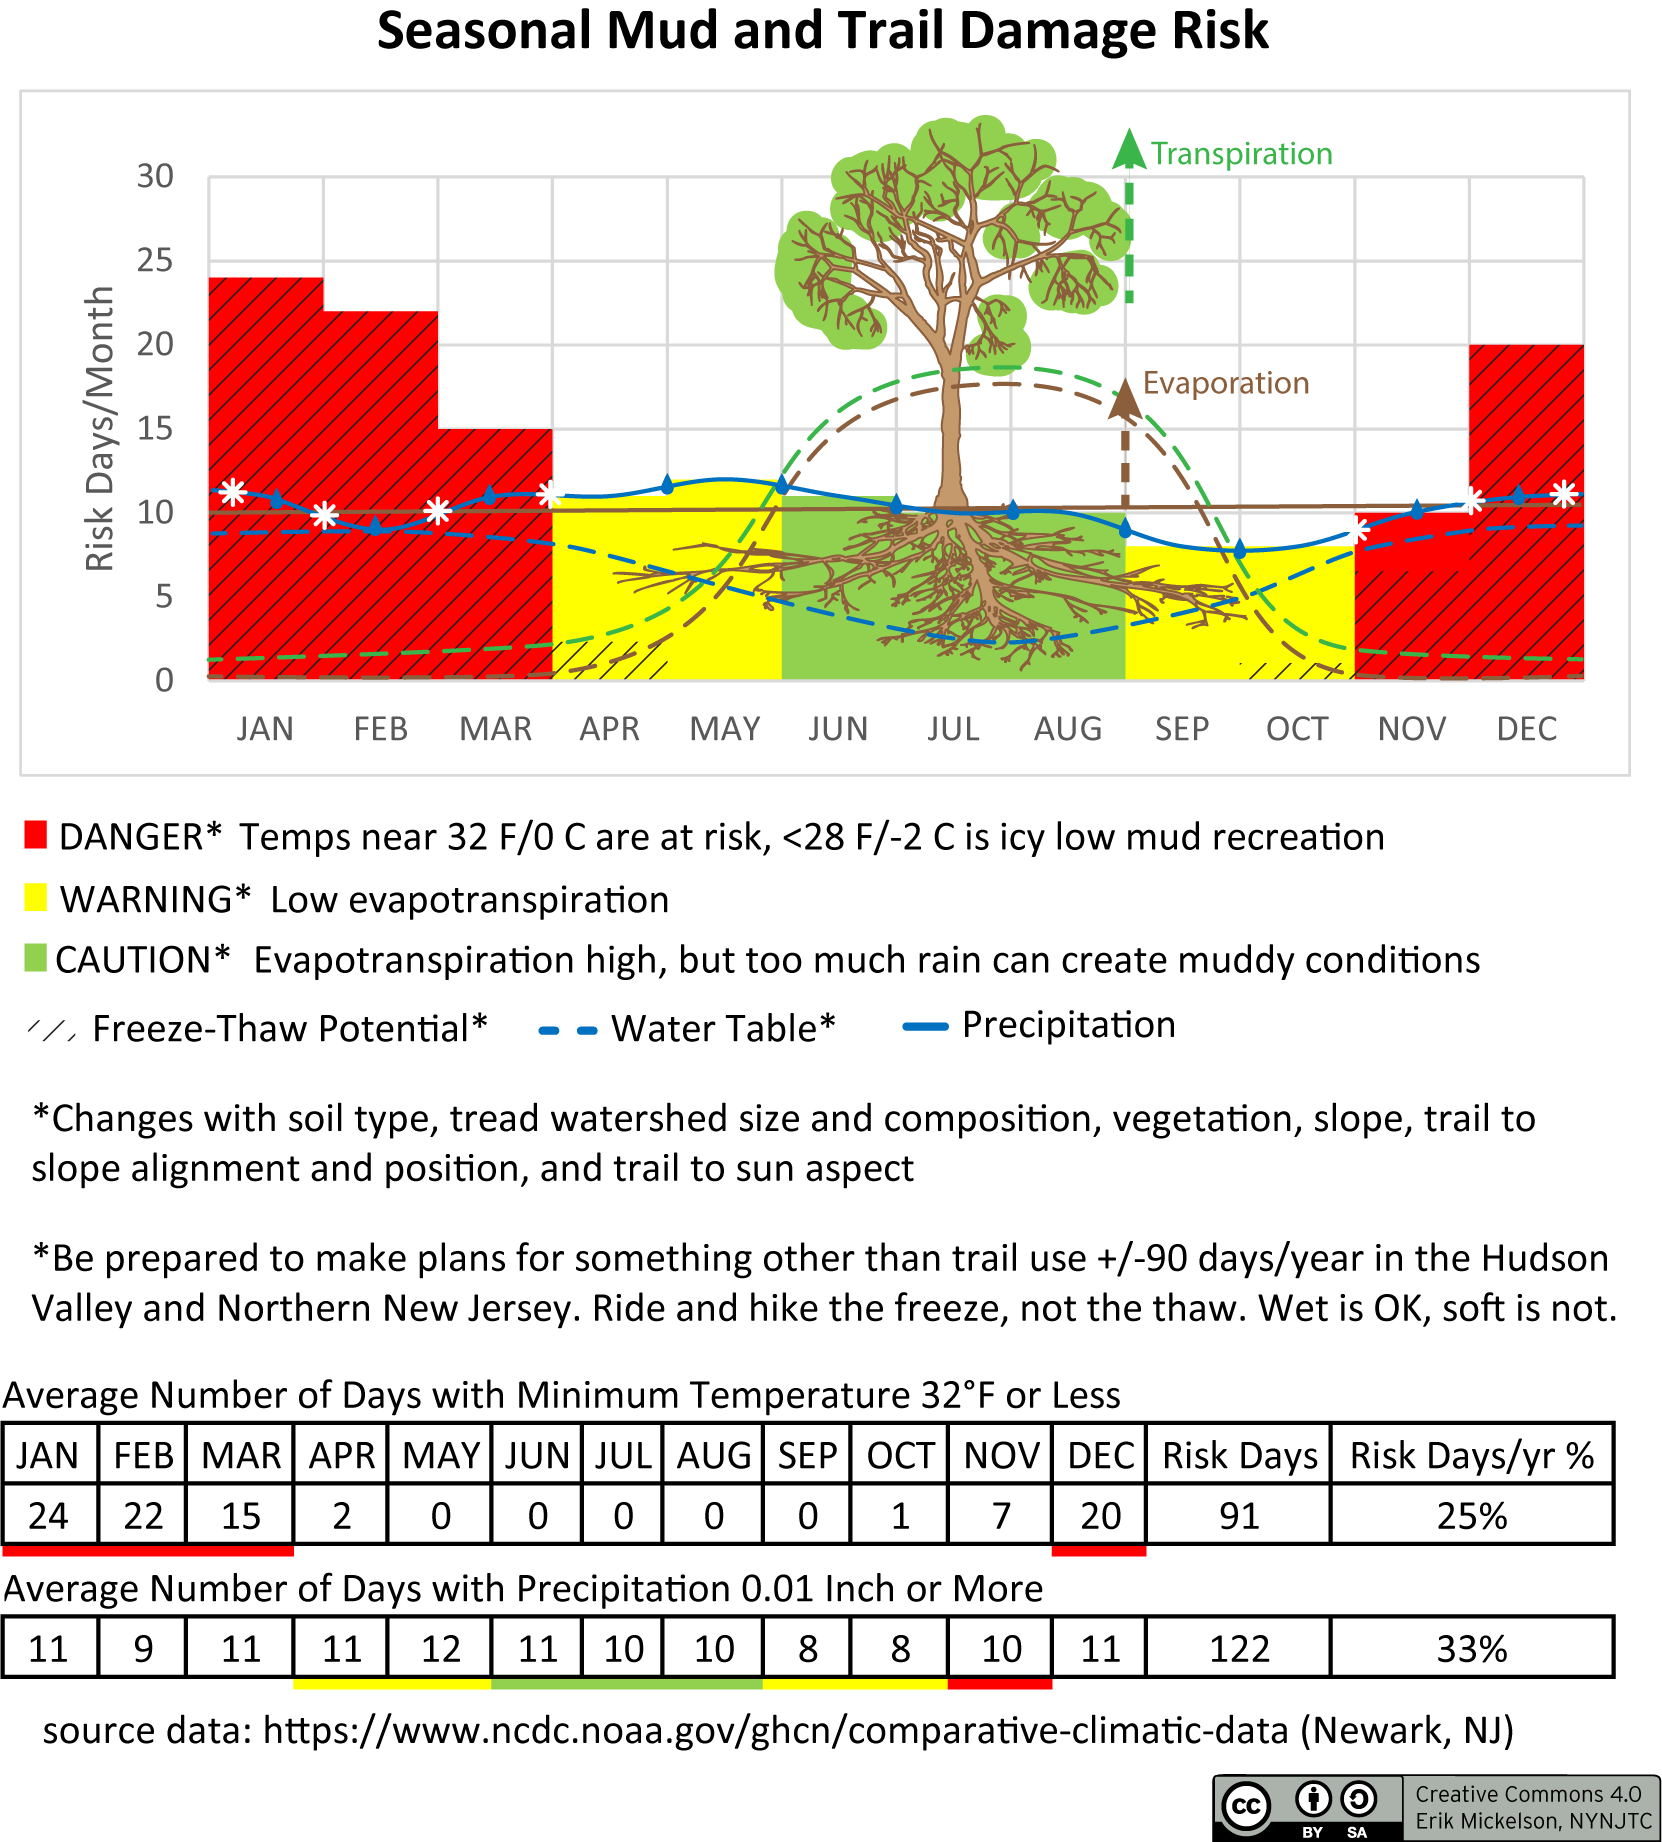
Mud and frost heave are usually related as freeze thaw cycles and heave typically coincide with muddy trails. More on muddy trails here.
Soil Compaction
Compacting the subsoil below where gravel will be placed for structures helps lower the risk of settling, and in frost heave prone areas compacting the subsoil is even more important as it will help lower the risk of heave. If the subsoil or trail tread is dusty and bone-dry, add water! Compared to moist soil, low moisture content soils aren’t as likely to compact enough to lower the risks of settling and frost heave.
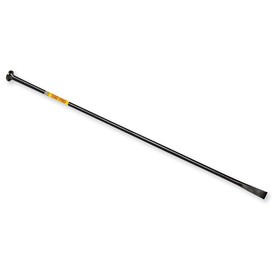
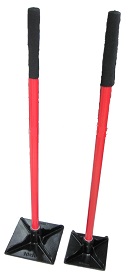
Different mechanical means of compacting soil are discussed in detail here, and in this soil compaction handbook, but they don’t cover hand tamping methods. A great deal of compaction can be obtained by packing by using hand tamps, and even more from the round end of a digging bar or even the heels of boots as compaction is a function of psi-pounds per square inch. Sledge hammers work too.
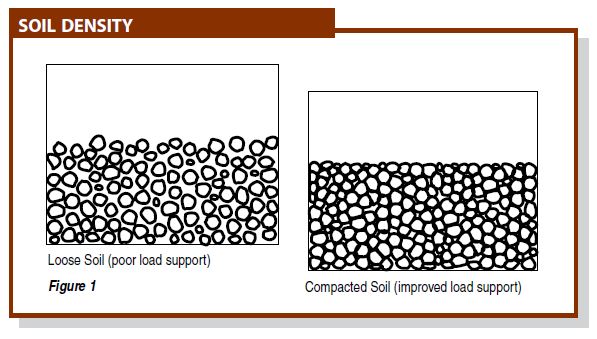 Compacted soils not only support loads better, they are not as permeable, slowing water movement to ice lenses, and they hold less water with which to add to the lenses because compacting soil lowers porosity (and the soil’s water holding capacity, in particular it’s field capacity)
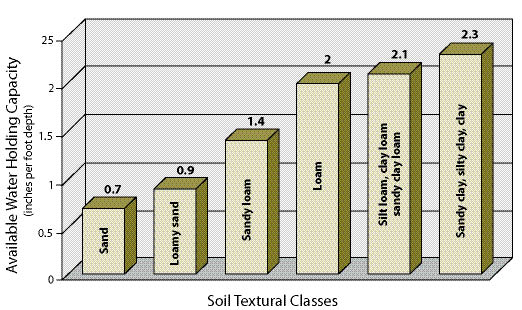
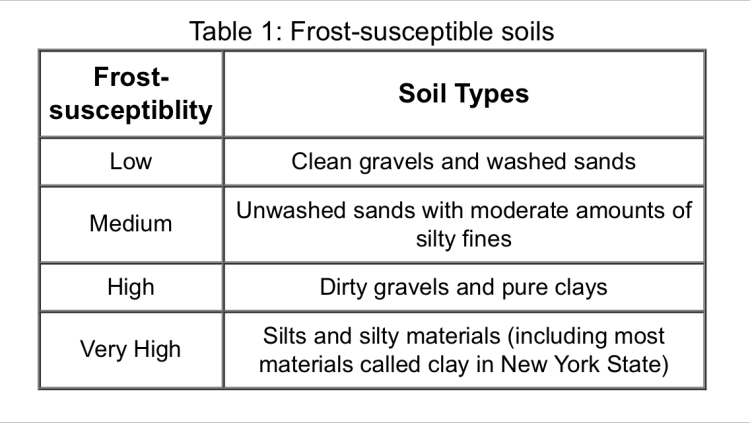
Two slightly different comparisons of frost heave potential by soil type: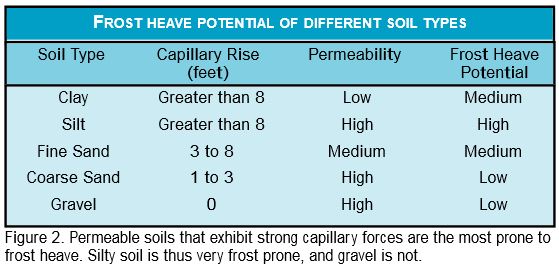
How moist should soil be for compaction? source:
- For soil moisture content use the hand test:
- Squeeze a ball of soil in your hand. If it’s powdery and won’t hold a shape, it’s too dry; if it molds into a ball then breaks into a couple of pieces when dropped, it’s about right; if it leaves moisture on your hand and doesn’t break when dropped, it’s too wet.
- Clay that you can push your thumb a few inches into with moderate effort has a bearing strength in the range of 1000 to 2500 psf
- Loose sand that you can just barely push a #4 rebar into by hand has a bearing capacity of 1000 to 3000 psf
- Sand that you can drive a #4 rebar into about 1 foot with a 5-pound hammer has a bearing capacity over 2000 psf
The act of compacting soil that is “too wet” will typically move soil to the sides of compaction impact because its too slippery and plastic. All the pore spaces are filled with water, and possibly even ‘floating,’ so compaction isn’t going to reduce pore spaces as effectively as ‘moist’ soil where it will stay put and pack down thanks to adhesive forces between water and soil. Water has a lubricating effect that helps particles slide into tighter positioning. If too dry the soil loses adhesive properties and is not as “plastic” or slick so it won’t pack down as well, if at all.
There are times when building trails that we can’t compact, as the moisture content is less than (or more than) ideal and there is no (or more) water coming in the foreseeable future. Plan your work and order of operations carefully. If you are going to build structures, do it when the moisture content is right, or add your own even if you have to pipe it in or transport it over by bucket. If you do add water be weary of how much. You may have to soak it well and let it sit several hours or overnight before compacting.
The hand test above should suffice. Below are the optimum moisture content percentages:
| Soil Description | USCS Class | Compacted Dry Unit Weight | Optimum Moisture Content (%) | |
|---|---|---|---|---|
| (lb/ft3) | (kN/m3) | |||
| Gravel/sand mixtures: | ||||
| well-graded, clean | GW | 125-134 | 19.6-21.1 | 8-11 |
| poorly-graded, clean | GP | 115-125 | 18.1-19.6 | 11-14 |
| well-graded, small silt content | GM | 119-134 | 18.6-21.1 | 8-12 |
| well-graded, small clay content | GC | 115-125 | 18.1-19.6 | 9-14 |
| Sands and sandy soils: | ||||
| well-graded, clean | SW | 109-131 | 17.2-20.6 | 9-16 |
| poorly-graded, small silt content | SP | 94-119 | 15.7-18.6 | 12-21 |
| well-graded, small silt content | SM | 109-125 | 17.2-19.6 | 11-16 |
| well-graded, small clay content | SC | 106-125 | 16.7-19.6 | 11-19 |
| Fined-grained soils of low plasticity: | ||||
| silts | ML | 94-119 | 14.7-18.6 | 12-24 |
| clays | CL | 94-119 | 14.7-18.6 | 12-24 |
| organic silts | OL | 81-100 | 12.7-15.7 | 21-33 |
| Fine-grained soils of high plasticity: | ||||
| silts | MH | 69-94 | 10.8-14.7 | 24-40 |
| clays | CH | 81-106 | 12.7-18.6 | 19-36 |
| organic clays | OH | 66-100 | 10.3-15.7 | 21-45 |
It is critical to compact the subsoil, and the crush, but a little confusing as a low permeable soil is desired, and a highly permeable crush is desired (i.e. we want gavel, not all fines and rock dust). A compacted soil is desired to reduce its permeability (and the capillary action that draws water to the lenses), and on the other hand a highly permeable crush is desired so it won’t hold water or let it move to lenses- and in both soil and crush, settling is an enemy that can disturb the completed work that sometimes takes hours to build or “set.” Many trail builders doing rock work use the word “set” to mean a rock is in it’s “in place” with little risk of moving. If the act of settling occurs because the subsoil was not compacted, was a supposedly “set” rock actually set? The same could be said for finishing off out sloped tread. If not compacted enough and users create a cupped tread with an outer berm…was the tread really finished?
Crushed Rock
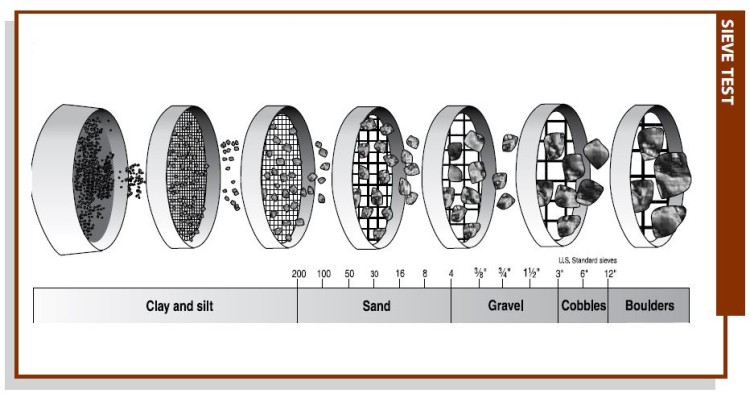
The words ‘crushed rock’ are used throughout this page to mean “gravel” and “cobbles” or “stone” depending on who you ask– from fist-sized rubble to marble sized gravel and fines.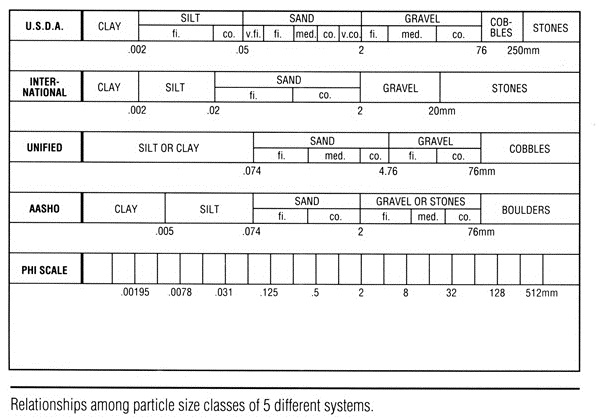 I say “crushed rock” because trail building often involves making cobble/stone/gravel in the field by crushing rocks of various sizes. It’s atypical to sift it through a gravel sieve for uniformity in the field, but if you have the time in some cases this may be needed. Sorting by eye and hand will suffice as well.
 PDF: Wentworth-Grain-Size-Chart
It is better to have larger stones at the base or soil/crush transition, and finer crush towards the actual structure’s base, especially if building drainage lenses where tread soil can settle its way down into the rock matrix. Some interspersed fines help glue the crushed rock base into a matrix of mixed sizes, but it could lower permeability depending on their percentage and arrangement in the matrix. They could form a capillary channel to draw water to a lens and heave.
The key in frost prone areas is to use crush rock. I won’t say x inches of crush, as it depends on the site. As long as water can leave from under a structure, and stop it from wicking upwards via capillary action to form ice lenses, the potential for heave damage will be lessened.
Crushed rock is used under structures, whether your area is susceptible to frost heave or not. However, if there is no danger of heave and there is no rock or crush handy builders can escape using a crush base if soil is compacted extremely well- preferably with soil moisture present as noted above.
Before adding crush compact the subsoil, and after you add crush compact the crush as well. My preferred method is to beat crush into the ground with a sledge to compact the soil, while at the same time crushing/smashing rocks into ‘gravel’ in the hole I intend to build over– a two-for-one deal of crushing rock and compacting the subsoil on the spot. Be careful how glued together the crush bed is with fines, as too many fines in the mix increases heave risk.
If pouring cement for bridge abutments or kiosk posts etc. its important to know the depth of the frost line. This goes for situations with no cement as well, like dry-stack stairs and walls. Where upwards wicking (or capillary action) can occur, even walls and steps should have a base deep enough to pass the frost line, or enough compaction and gravel to ensure there is no chance for lens growth given your soil type.
In some areas where frost penetration is deep, it is impractical to replace all the soil susceptible to frost with crush rock, but some crush is better than none. How much? How likely is that that water will wick up and start forming ice lenses? How high is the water table, and how well does the soil drain? What type of soil will the structures be placed on?
If possible, dig below the frost line and add crush up to the structure’s intended base to lower the frost heave risk. However, this is often impractical when frost lines are over 4-5 inches deep. At about four inches of crush you “might” start to escape heave risks, but more is better, and going below the frost line is best, especially if building on more susceptible soils. If you build near wetlands or a location with a high water table the potential for frost heave is much greater as there is a source of readily available water to feed or draw water into growing ice lenses. In these locations reroute the trail or add subdrains as a means to pull water away from your structure, but this is also often impractical in some situations. If you are lucky, some of these low area already have several inches or feet of rock underfoot as water has washed most of the soil and fines away.
An example:
Looking at the map above for south eastern New York, with 500-750 degree days (over ten years) a crush rock base of 30 inches or more would be wise. The frost line is about 32 inches locally where I live and build. Further, if it was determined by soil test or this USDA soil survey for the area, that building was occurring on a clayey silt of glacial till, I’d have reason to worry as water could move quickly through the soil and create growing ice lenses. If compacted well however, permeability would decrease to slow down lens formation, and if crush is added the likelihood of water sticking around is low. Nevertheless, by packing the subsoil what could occur? Not likely, but if infiltration is slow enough into the subsoil there could be a perched water table. Luckily the crush isn’t likely to draw water from that perch to form lenses by capillary action because the crush is so permeable, but if it gets cold fast enough that water may freeze into a block of ice with gravel cubes in it. The fight against heave isn’t bullet proof, but its the growth of ice lenses that causes heaving, and this isn’t as likely to occur if building smart.
Happy building, and good luck…
